Best Home Recording Studio Setup Ideas & Equipment

Creating a home recording studio can be a thrilling journey, a space where your musical ideas come to life. Whether you’re a budding podcaster, an aspiring musician, or an established content creator, the right setup can elevate your production quality and streamline your creative process. Let’s dive into the world of home recording studios and explore how you can build a setup that resonates with your unique style and needs.
Key Takeaways:
-
Identifying the ideal room for your studio is crucial for sound quality and comfort.
-
A reliable computer and audio interface are the heart of a digital home studio.
-
Investing in the right microphones and monitors enhances recording fidelity.
-
Acoustic treatment is essential for achieving professional-sounding recordings.
-
Future-proofing your studio with expandable and up-to-date equipment is a smart move.
Optimizing Your Creative Space
Imagine a space where every note you play or word you speak is captured with crystal clarity. That’s what a well-optimized recording space can do for you. It’s not just about the gear; it’s about creating an environment that’s conducive to creativity and focus. Here’s how to make your space work for you.
Choosing the Right Room for Your Home Studio
When you’re scouting locations within your home for your studio, think about the room’s acoustics. A room with minimal echo and outside noise is your best bet. If you have a choice, go for a room with irregular walls or a closet packed with clothes—these naturally dampen sound and reduce echo.
Remember, size matters too. A larger room can offer a more versatile recording environment, but it also requires more acoustic treatment. Conversely, a smaller room is easier to manage but can feel cramped. Balance is key.
Here’s a tip: clap your hands in the center of the room. Listen for the echo. If it’s pronounced, you’ll need to invest in some acoustic treatment to tame those reflections.
Designing for Workflow Efficiency and Comfort
Now, let’s talk about the layout. You want everything within arm’s reach, right? Place your gear strategically so you can access it quickly and comfortably. Consider an ergonomic chair and desk, because you’ll be spending a lot of time here, and you don’t want to end the day with a backache.
Lighting is also important. Natural light can be inspiring, but if you’re a night owl, you’ll need good quality artificial lighting that’s easy on the eyes. Soft, adjustable lighting can set the mood and keep you in the zone for hours.
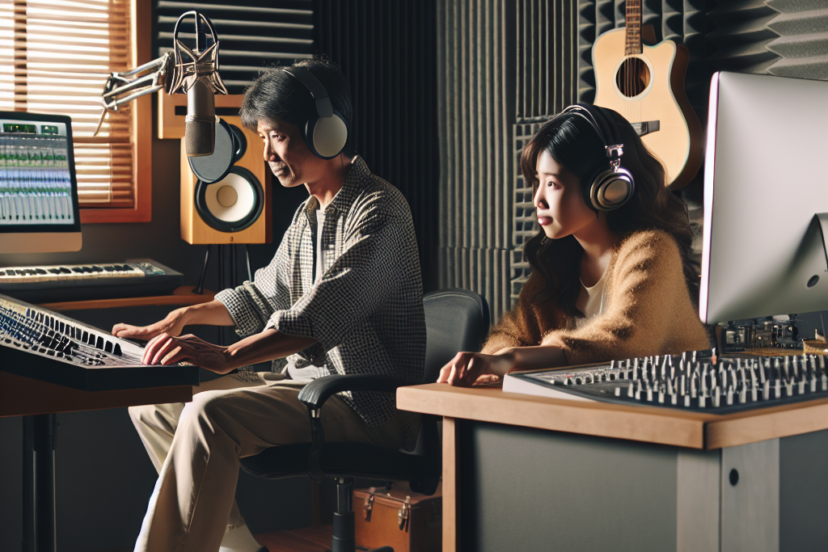
Critical Recording Gear to Consider
Alright, let’s get into the nuts and bolts of your setup. There are a few pieces of gear that are absolutely essential, no matter what you’re recording. Let’s break them down.
First, you’ll need a solid computer. It doesn’t have to be the latest model, but it needs to be reliable and fast enough to handle your recording software without hiccups. Think of it as the brain of your operation.
-
Computer: Stable and speedy to handle your DAW and plugins.
-
Audio Interface: Your gateway to high-quality digital audio.
-
Microphones: The right mic for the right job, whether you’re recording vocals or instruments.
-
Headphones: For detailed listening and monitoring your work.
-
Monitors: To accurately playback and mix your recordings.
-
Cables and Stands: The unsung heroes that connect and support your gear.
Next, you’ll need an audio interface. This is the piece that converts your analog sounds into digital signals your computer can understand. It’s crucial for recording instruments and microphones with precision.
Computer: The Hub of Digital Production
Your computer is where the magic happens. It’s where you’ll record, edit, mix, and master your tracks. Make sure it has enough processing power and memory to run your Digital Audio Workstation (DAW) and any other software you’ll be using.
Think about storage too. Audio files can be large, so having a dedicated solid-state drive (SSD) for your projects will keep things running smoothly. And don’t forget about backups! An external hard drive or cloud storage can save the day if something goes wrong.
And let’s not overlook the importance of a high-resolution display. You’ll be staring at this screen for hours, so make sure it’s large enough and has a resolution that’s easy on the eyes.
Audio Interface: The Bridge Between Analog and Digital
Now, your audio interface is like a translator. It takes the sounds from your microphones or instruments and turns them into digital audio that your computer can work with. Look for one with high-quality preamps and enough inputs and outputs for your needs.
Microphones: Capturing Quality Sound
Microphones are the ears of your studio. A versatile large-diaphragm condenser mic is a great starting point for vocals and a variety of instruments. If you’re recording something specific, like a podcast or drums, you’ll want to explore mics designed for those purposes.
Remember, placement is everything. Even the best microphone won’t sound good if it’s not positioned correctly. Take the time to experiment with different angles and distances to find the sweet spot.
Headphones and Monitors: Critical Listening Tools
Headphones are your best friend when it comes to monitoring your recordings. They let you hear every detail without room acoustics getting in the way. Closed-back headphones are ideal for recording, as they prevent sound from leaking into your microphone.
When it comes to mixing, however, you’ll want a pair of studio monitors. These speakers are designed to give you a flat, accurate representation of your sound, so you can make precise adjustments to your mix.
Accessories: Stands, Cables, and More
You’ve got the big pieces in place, but don’t forget about the accessories. Quality cables are the lifelines of your studio, carrying signals without noise or interference. Mic stands keep your microphones stable and positioned correctly, and a pop filter can be the difference between a professional-sounding vocal and one plagued by plosives.
And here’s a pro tip: label your cables. When you’re in the middle of a creative burst, the last thing you want is to be fumbling around trying to figure out what’s plugged in where.
Stay tuned for more detailed insights as we continue to build out the ultimate guide to the best home recording studio setup ideas and equipment. We’ll cover everything from software to acoustic treatment, ensuring you have all the knowledge you need to create a space that’s both functional and inspiring.
Computer: The Hub of Digital Production
Your computer is your studio’s mission control. It’s where your ideas are transformed into polished tracks. Make sure it’s equipped with enough horsepower to run your favorite DAW and plugins without a glitch. A fast processor, ample RAM, and an SSD for quick access to your files are non-negotiable for a smooth experience.
Now, you might be wondering, “Do I need a top-of-the-line computer?” Not necessarily. But you do need one that won’t buckle under pressure when you’re layering tracks or adding effects. Think of it as investing in the foundation of your home studio. A solid foundation means fewer crashes and more music-making.
And here’s a little secret: A dual-monitor setup can be a game-changer. It allows you to have your mixing console on one screen and your tracks on another, streamlining your workflow and making the process a whole lot more enjoyable.
Audio Interface: The Bridge Between Analog and Digital
The audio interface is your gateway to pristine sound. It’s what takes the music from your instruments and mics and feeds it into your computer. A good interface will have clean preamps for boosting your microphone signals without adding noise, and enough input/output options to connect all your gear.
But how do you choose the right one? It’s simple: match the interface to your needs. If you’re a solo artist, a couple of inputs might be all you need. But if you’re planning to record a full band, you’ll want more inputs to capture everyone at once. And don’t forget about latency – look for interfaces with low latency so you can monitor your recordings in real-time without delay.
Remember, the interface is the workhorse of your studio. It’s worth investing in quality here, as it directly affects the sound of your recordings. A reliable interface means fewer technical issues and more time focused on creating.
Microphones: Capturing Quality Sound
Microphones are the storytellers of your studio, each with its own character. The large-diaphragm condenser mic is a studio staple, known for its sensitivity and breadth of sound—perfect for vocals and acoustic instruments. But don’t stop there. Dynamic mics are your go-to for louder sources like guitar amps and drums, thanks to their durability and focused pickup pattern.
It’s not just about having a variety of mics, but knowing how to use them. For instance, placing a dynamic mic close to a snare drum will capture its punchy attack, while a condenser mic positioned over a cymbal will catch the shimmering highs. It’s this kind of know-how that turns a good recording into a great one.
And let’s not forget about ribbon mics. These beauties are known for their warm, vintage sound. They’re delicate, but for the right source, like a smooth vocal or a mellow guitar, they can add a touch of magic to your recordings.
Headphones and Monitors: Critical Listening Tools
Good headphones give you an intimate listening experience, revealing details you might miss on speakers. They’re indispensable for tracking, allowing you to hear the backing track without it bleeding into the microphone. Look for closed-back headphones with good isolation and a flat response for the most accurate monitoring.
When you’re ready to mix, it’s time to switch to studio monitors. These speakers are designed to give you a true picture of your sound, warts and all. They help you make informed decisions about your mix, ensuring it sounds good on a wide range of playback systems.
But monitors are only as good as the room they’re in. Even the best monitors will sound off in a poorly treated room. That’s why room treatment is essential, but more on that later. For now, remember that a pair of reliable monitors in a well-treated room is the key to mixes that translate well everywhere.
There you have it. We’ve covered the computer, the audio interface, microphones, and monitoring—four cornerstones of a solid home recording studio. Each plays a pivotal role in the recording process, and getting them right sets the stage for a studio that not only functions smoothly but inspires you to create your best work.
Accessories: Stands, Cables, and More
It’s the little things that often make the biggest difference. Sturdy mic stands keep your mics exactly where they need to be, preventing unwanted noise and movement. Quality cables are the veins of your studio—opt for shielded ones to minimize interference and maintain signal integrity. And don’t forget about a pop filter; it’s the unsung hero that keeps those pesky plosives from ruining your vocal takes.
Here’s a checklist of accessories to consider:
-
Mic stands: Get both straight and boom stands for flexibility.
-
Cables: Invest in XLRs for mics and TRS or TS cables for instruments.
-
Pop filters: Essential for clean vocal recordings.
-
Headphone amplifier: If you’re recording with others, everyone needs a good mix.
-
Cable ties: Keep your space tidy and your cables organized.
-
Power conditioner: Protect your gear and reduce electrical noise.
And remember, proper cable management isn’t just about looking neat—it’s about functionality. A well-organized studio reduces clutter, making it easier to focus on your work and troubleshoot any issues that arise.
Software for Sound Creation and Editing
With your hardware in place, it’s time to talk software. This is where your recordings come to life, where you cut, paste, polish, and perfect. The right software will feel like an extension of your creative mind, intuitive and powerful.
Choosing a Digital Audio Workstation (DAW)
Your DAW is your digital canvas. It’s where all the elements of your song or podcast come together. There are many options out there, from industry standards like Pro Tools and Logic Pro to more budget-friendly choices like Reaper or Audacity. When choosing a DAW, consider the following:
-
User interface: It should be intuitive and match your workflow.
-
Compatibility: Make sure it works well with your operating system and hardware.
-
Features: Look for the tools you need, like MIDI support or video compatibility.
-
Community and support: A strong user base means lots of tutorials and help.
Most DAWs offer a trial period, so take advantage of this to find the one that feels right. And remember, the best DAW is the one you’re comfortable with. It’s not about the price tag or the brand; it’s about how it helps you bring your ideas to life.
Vital Plugins and Virtual Instruments
Plugins are the spices in your studio’s kitchen. They add flavor and color to your sound. From EQs and compressors to reverbs and delays, plugins help you shape your sound and bring out the best in your recordings. Virtual instruments, on the other hand, open up a world of sounds—from grand pianos to synthesizers, all at your fingertips.
Here’s a tip: start with the plugins that come with your DAW. They’re usually more than capable of getting the job done. As you grow, you can start exploring third-party options that offer unique features or different sound characteristics.
And don’t go overboard. It’s easy to get lost in the sea of plugins available, but too many choices can be overwhelming. Learn a few well, and they’ll serve you better than a hundred you barely know.
By now, you should have a clear picture of how to set up your home recording studio. From the physical space to the gear and the software, each element plays a critical role in your ability to create and produce high-quality audio. Stay tuned for more insights as we continue to explore the best home recording studio setup ideas and equipment.
Enhancing Audio Fidelity
Great gear is important, but even the best equipment won’t sound its best without proper acoustic treatment. This is where we turn a good sounding room into a great one, ensuring that what you hear is a true reflection of your work.
Acoustic Treatment Essentials
Acoustic treatment is all about controlling how sound behaves in your space. It’s not about soundproofing—that’s a different beast—it’s about making sure the sound within your room doesn’t bounce around and muddy your recordings or mixes. Here’s what you need to know:
-
Bass traps: These go in the corners of your room to absorb low frequencies that tend to build up there.
-
Acoustic panels: Place these on the walls at reflection points to tame mid to high frequencies.
-
Diffusers: These scatter sound waves, preventing standing waves and flutter echoes.
-
Reflection filters: A portable solution for vocal recordings, these help to isolate the mic and control the sound.
Remember, you don’t have to break the bank. Many musicians and podcasters DIY their acoustic treatment with great results. The key is to understand the principles and apply them to your space.
And don’t forget to test your room once you’ve treated it. Play some music you know well and listen. Does it sound clear and balanced? If not, tweak your treatment until it does. This iterative process is crucial to achieving professional audio fidelity in your home studio.
Isolating Vocals and Instruments for Clarity
Isolation is key when you’re recording, especially if you’re working in a less-than-ideal space. It’s about focusing on the sound source and minimizing everything else. For vocals, a reflection filter can work wonders, creating a mini vocal booth around your microphone. For instruments, consider isolation pads or shields, particularly for drums and amps.
It’s also worth considering the time of day you record. If you live in a noisy area, plan your sessions for when it’s quieter. It’s a simple tip, but it can make a huge difference in the clarity of your recordings.
Building for the Future
Building a home studio isn’t just about meeting your current needs. It’s about anticipating where your journey might take you and ensuring your setup can grow with you. Let’s look at how you can future-proof your studio.
Expandability of Equipment
When choosing gear, think about how it might fit into your setup down the line. Will that audio interface allow you to add more inputs if you start recording a full band? Can your computer’s memory and storage be upgraded? Here’s what to consider:
-
Modular gear: Equipment that allows for expansion, like additional preamp modules or I/O options.
-
Scalable software: DAWs and plugins that offer advanced features as you need them.
-
Universal connections: Gear with common connection types like USB, Thunderbolt, or XLR, ensuring compatibility with future devices.
Investing in gear that can grow with you means you won’t have to replace everything when you’re ready to take the next step. It’s about smart choices that serve you now and in the future.
Embracing New Technology and Trends
The world of music and audio production is always evolving. Stay informed about new gear, software, and production techniques. Subscribe to industry blogs, join forums, and network with other creators. This doesn’t mean you have to jump on every trend, but being aware allows you to make informed decisions about what could enhance your work.
And remember, the best studio is one that works for you. It’s a personal space that should inspire creativity and productivity. By building a setup that’s both functional and flexible, you’re creating a foundation for endless possibilities.
There you have it, a comprehensive guide to building a home recording studio that not only meets your current needs but is also ready for whatever the future holds. From the critical gear to the software, from acoustic treatment to expandability, you now have the knowledge to create a space that’s tailored to your creative vision. Go forth and make music, podcasts, or whatever audio magic you’re into, and do it with the confidence that your home studio is up to the task.
Expandability of Equipment
Future-proofing your studio starts with selecting gear that can grow as your needs evolve. Opt for an audio interface with additional inputs and outputs, so you can connect more instruments and microphones as you expand. Your computer should have the capability to upgrade RAM and storage, allowing for larger sessions and more demanding software.
-
Choose gear with extra slots or bays for future upgrades.
-
Opt for interfaces with ADAT or SPDIF to add more preamps later.
-
Ensure your MIDI controller can integrate with new software and hardware.
-
Invest in a modular synth setup to add new sounds over time.
-
Look for equipment that supports firmware updates to extend its longevity.
By considering these factors, you’re not just buying for today; you’re investing in your future creativity. This approach saves you money in the long run and keeps your studio at the cutting edge of your evolving craft.
Embracing New Technology and Trends
Staying current with the latest advancements in recording technology can give you a competitive edge and enhance your creative expression. From the newest plugins that emulate classic hardware to the latest in digital mixing consoles, keeping an eye on what’s new can inspire fresh ideas and techniques.
Here’s how to stay on top of the game:
-
Follow industry news and forums to learn about new gear and software.
-
Attend trade shows and workshops to get hands-on experience.
-
Subscribe to music production YouTube channels for reviews and tutorials.
-
Join online communities where you can discuss and share knowledge with peers.
-
Experiment with new sounds and production methods to keep your work innovative.
Embracing new technology doesn’t mean you need to chase every trend. Instead, focus on what genuinely improves your workflow or opens up new creative possibilities. Always remember that the best tool for the job is the one that helps you realize your vision.
FAQs on Home Studio Setup
What Basic Equipment is Needed for a Home Recording Studio?
Starting a home studio can be as simple or as complex as you want it to be, but there are a few essentials you’ll need to get started:
Now that you’re equipped with the knowledge of what it takes to build a functional and expandable home recording studio, you’re ready to embark on your creative journey. Remember, the best studio is one that serves your unique process and helps you produce your best work. So go ahead, set up your space, and let the world hear what you have to offer!